ซื้อสินค้า คลิกไปที่ https://www.lazada.co.th/shop/adventek
ซื้อสินค้า คลิกไปที่ http://www.adventek.biz
1. ในตอนนี้เราจะใช้ WEMOS D1 mini (ESP8266) ติดต่อด้วย mqtt ผ่าน WiFi ไปยัง Node-Red เพื่อรับส่งข้อมูล
หน้าตา WEMOS D1 mini ดังรูป

Technical specifications
| Microcontroller | ESP-8266EX |
|---|---|
| Operating Voltage | 3.3 V |
| Digital I/O Pins | 11 |
| Analog Input Pins | 1 (Max input: 3.2 V) |
| Clock Speed | 80 MHz/160 MHz |
| Flash | 4 Mbytes |
| Length | 34.2 mm |
| Width | 25.6 mm |
| Weight | 3 g |
Pin assignments
| Pin | Function | ESP-8266 Pin |
|---|---|---|
| TX | TXD | TXD |
| RX | RXD | RXD |
| A0 | Analog input, max 3.3V input | A0 |
| D0 | IO | GPIO16 |
| D1 | IO, SCL | GPIO5 |
| D2 | IO, SDA | GPIO4 |
| D3 | IO, 10k Pull-up | GPIO0 |
| D4 | IO, 10k Pull-up, BUILTIN_LED | GPIO2 |
| D5 | IO, SCK | GPIO14 |
| D6 | IO, MISO | GPIO12 |
| D7 | IO, MOSI | GPIO13 |
| D8 | IO, 10k Pull-down, SS | GPIO15 |
| G | Ground | GND |
| 5V | 5V | - |
| 3V3 | 3.3V | 3.3V |
| RST | Reset | RST |
2. ติดตั้ง Arduino IDE บน ubuntu 18.04 LTS
ดาวน์โหลด arduino-1.8.9-linux64.tar.xz จาก www.arduino.cc
ลงใน folder ที่ต้องการ จากนั้นให้แตกไฟล์
$ tar xvf arduio-1.8.9-linux64.tar.xz
$ cd arduino-1.8.9
$ ./install.sh
จากนั้นไปที่หน้า Ubuntu GUI แล้วเปิดโปรแกรมจากหน้า Ubuntu GUI ได้เลย
3. ติดตั้ง WEMOS D1 mini library ใน Arduino IDE ในตอนที่แล้วสมมติว่าเราติดตั้ง Arduino IDE ใน folder
/home/vitaya เราจะใช้คำสั่งต่อไปนี้
$ cd /home/vitaya/arduino-1.8.9
$ cd hardware
$ mkdir esp8266com
$ cd esp8266com
$ git clone https://github.com/wemos/Arduino_D1.git esp8266
$ cd esp8266
$ cd tools
$ python get.py
เมื่อคำสั่งเรียบร้อย ให้ออกจาก Arduino IDE แล้วล็อคอินเข้าใหม่คลิกไปที่ Tools → Board: "WEMOS D1 2 mini"
Upload Speed: "115200"
Port: "dev/ttyUSB0"
4. ติดตั้ง mqtt client library บน Arduino IDE ดาวน์โหลดจาก
https://github.com/knolleary/pubsubclient/archive/master.zip แล้วแตก zip file
$ unzip master.zip
จะได้ folder pubsubclient-master แล้วเปลี่ยนชื่อเป็น pubsubclient
$ mv pubsubclient-master pubsubclient
$ mv pubsubclient /home/vitaya/arduino-1.8.9/libraries
เป็นอันเรียบร้อย แล้วปิดเปิด Arduino IDE ใหม่ ก็จะเห็น library นี้แล้ว
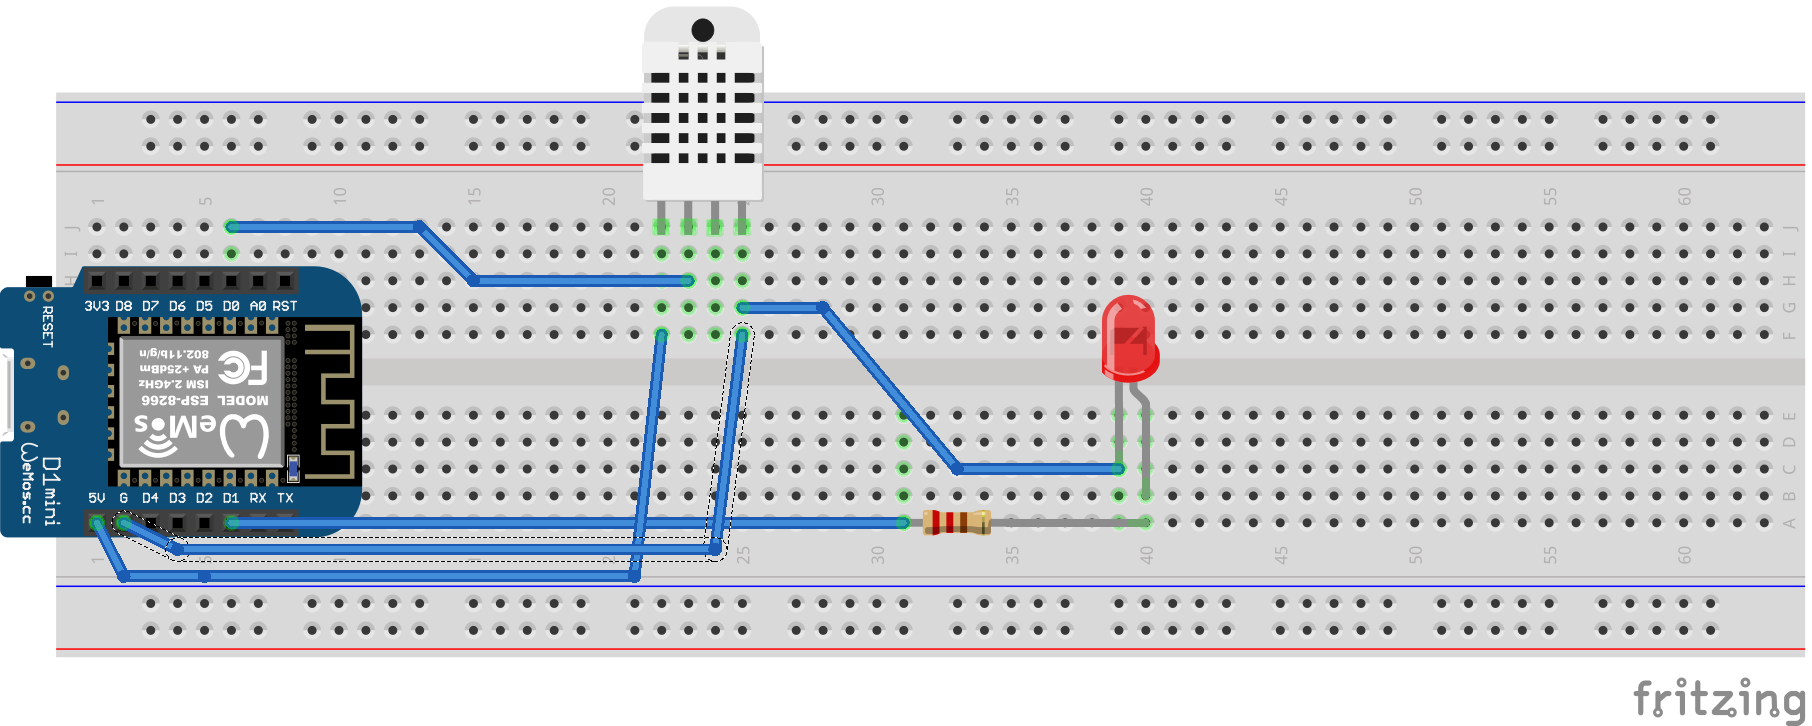
5. ต่อวงจร และ upload code เข้า WEMOS D1 mini ต่อ DHT11 (ตัววัดอุณหภูมิและความขื้น) เข้ากับ D0 (GPIO 16)
ต่อ LED เข้ากับ D1 (GPIO 5)
ดาวน์โหลด code ตามลิ้งค์
https://github.com/young-at-heart/home_automation/blob/main/node-mqtt.ino
// ==================== //
/*
Basic ESP8266 MQTT
*/
#include <ESP8266WiFi.h>
#include <PubSubClient.h>
#include <SimpleDHT.h>
// WiFi Parameters & MQTT Server IP Address
SimpleDHT11 dht11;
char ssid[] = "XXX"; // WiFi SSID
char password[] = "yyyuuuddd"; // WiFi password
char mqtt_server[] = "192.168.1.254"; // mqtt server IP address
long lastMsg = 0;
char msg[50];
int value1 = 0;
int value2 = 0;
int OUT_LED = 5;
int DHTPIN = 16;
byte temp = 0;
byte humid = 0;
WiFiClient espClient;
PubSubClient client(espClient);
void setup_wifi() {
// We start by connecting to a WiFi network
Serial.println("Connecting to ");
Serial.println(ssid);
WiFi.begin(ssid, password);
while (WiFi.status() != WL_CONNECTED) {
Serial.print("*");
delay(500);
}
Serial.println("");
Serial.println("WiFi connected");
Serial.println("IP address: ");
Serial.println(WiFi.localIP());
}
void callback(char* topic, byte* payload, unsigned int length) {
Serial.print("Message arrived [");
Serial.print(topic);
Serial.print("] ");
for (int i = 0; i < length; i++) {
Serial.print((char)payload[i]);
}
Serial.println();
// Switch on the LED if an 1 was received as first character
if ((char)payload[0] == '1') {
digitalWrite(OUT_LED, HIGH);
// Turn the LED on - Note that LOW is the voltage level
// But actually the LED is on.
// It is acive low on the ESP32.
} else {
digitalWrite(OUT_LED, LOW);
}
}
void reconnect() {
// Loop until we're reconnected
while (!client.connected()) {
Serial.print("Attempting MQTT connection ...");
// Attempt to connect
if (client.connect("ESP8266Client")) {
Serial.println("connected");
// Once connected, publish an announcement
client.publish("outTopic", "Hello !!!");
// And resubscribe
client.subscribe("inTopic");
} else {
Serial.print("failed, rc=");
Serial.print(client.state());
Serial.println(" try again in 5 seconds");
// Wait 5 seconds before retrying
delay(5000);
}
}
}
void setup() {
pinMode(OUT_LED, OUTPUT); // Initialize the BUILTIN_LED pin as an output
Serial.begin(115200);
setup_wifi();
client.setServer(mqtt_server, 1883);
client.setCallback(callback);
}
void loop() {
if (WiFi.status() != WL_CONNECTED) {
WiFi.disconnect();
delay(500);
setup_wifi();
}
if (!client.connected()) {
reconnect();
}
client.loop();
long now = millis();
if (now - lastMsg > 2000) {
lastMsg = now;
dht11.read(DHTPIN, &temp, &humid, NULL);
value1 = (int)temp;
value2 = (int)humid;
snprintf (msg, 75, "Temperature is %d and Humidity is %d", value1, value2);
Serial.print("Publish message: ");
Serial.println(msg);
client.publish("outTopic", msg);
}
}
// ==================== //
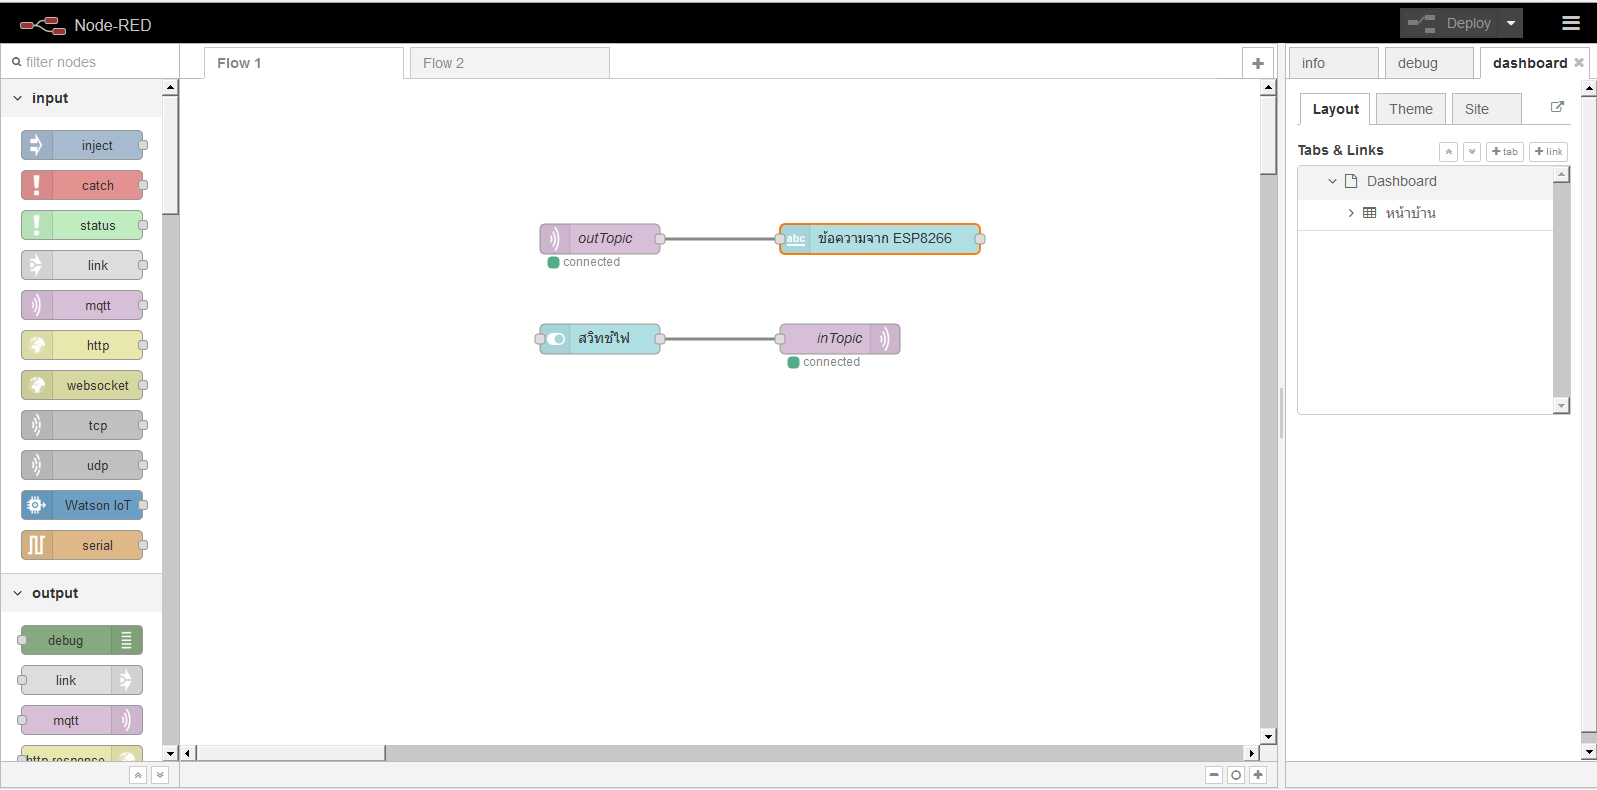
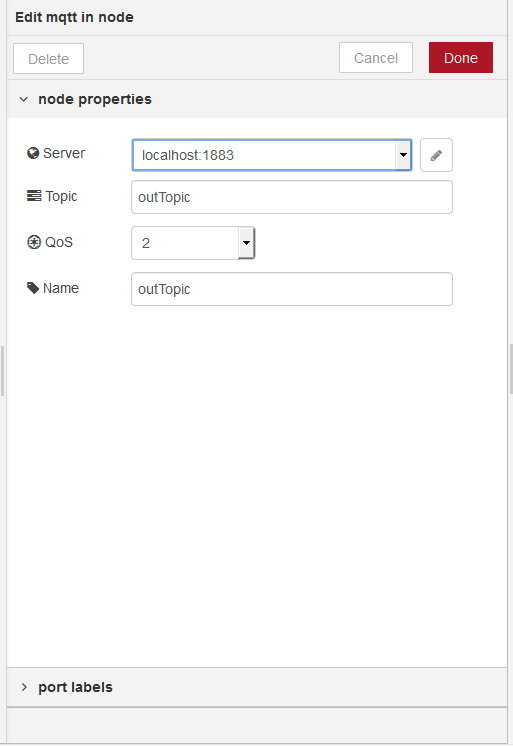
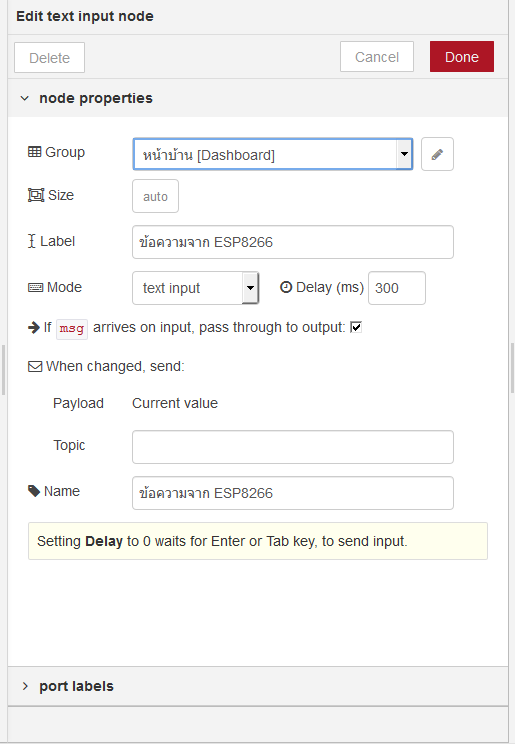
6. คอนฟิก Node-RED
Node-RED flow
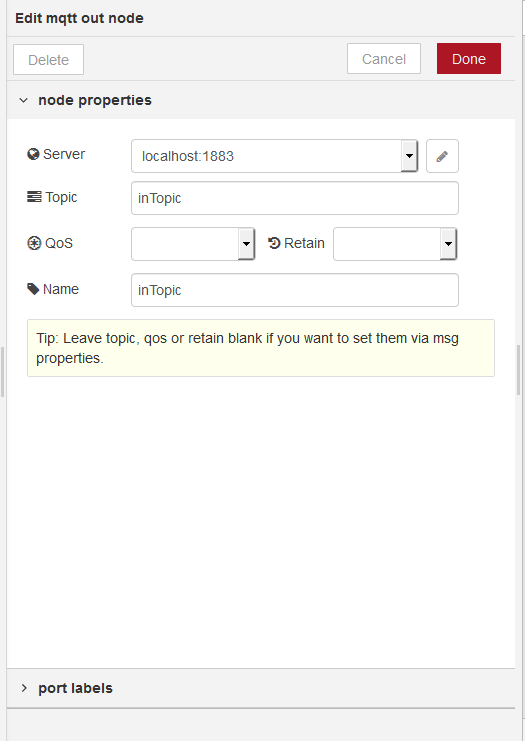
node properties - outTopic
node properties - Message
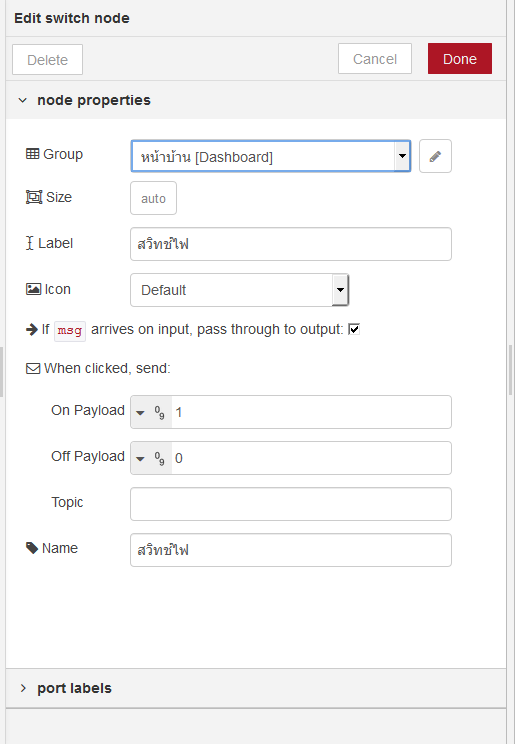
node properties - switch
node properties - inTopic
Node-RED ui
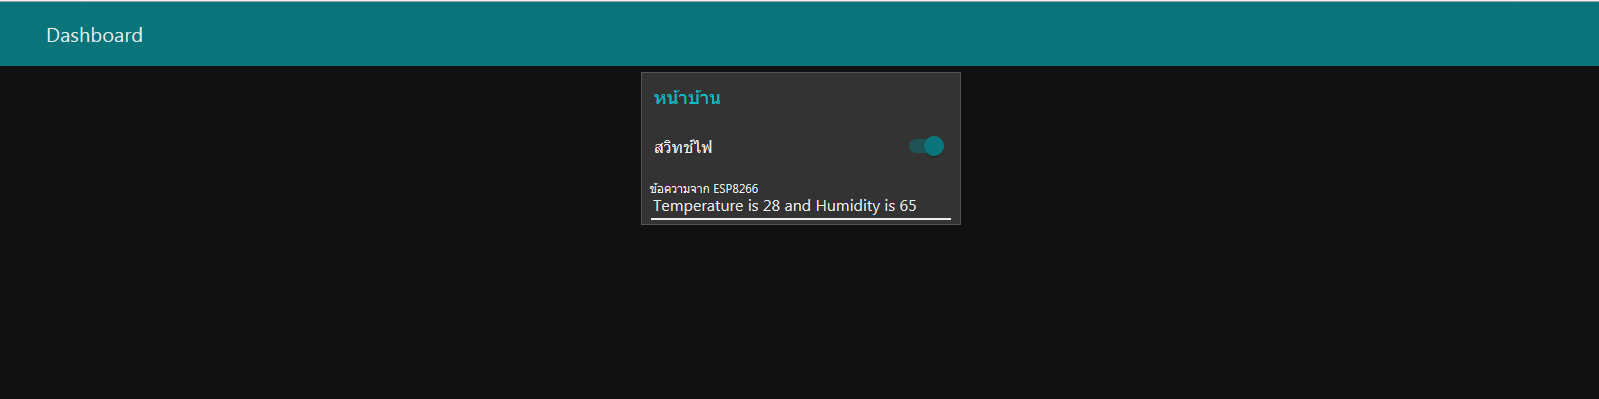
บน Node-RED ui จะเห็น Temperature and Humidity แสดงว่า WEMOS สามารถส่ง message มายัง Node-RED ได้ ถ้าเราเปิดปิด switch บน Node-RED ui LED ที่ต่ออยู่กับ WEMOS ก็ ON/OFF แสดงว่า Node-RED ส่งสัญญาณไปให้ WEMOS ได้เช่นกัน